
How to Disassemble Office Cubicles in 30 Minutes?
Disassembling office cubicles and modular office furniture quickly and safely is an important part of any office move, renovation, or layout change.
When the process is done the right way, it can save time, reduce costs, and help protect the parts from damage during transport.
If you are wondering how to disassemble office cubicles in 30 minutes, the answer starts with clear planning and simple steps.
First, clear the area. Then remove office desks, shelves, and other attached items. After that, loosen the connectors and carefully separate the panels. Make sure to label all hardware so reassembly is easier later.
In this step-by-step guide, you will learn how to disassemble a standard office cubicle safely and efficiently in under 30 minutes.
Even if you have never done it before, the process can be simple with the right preparation.
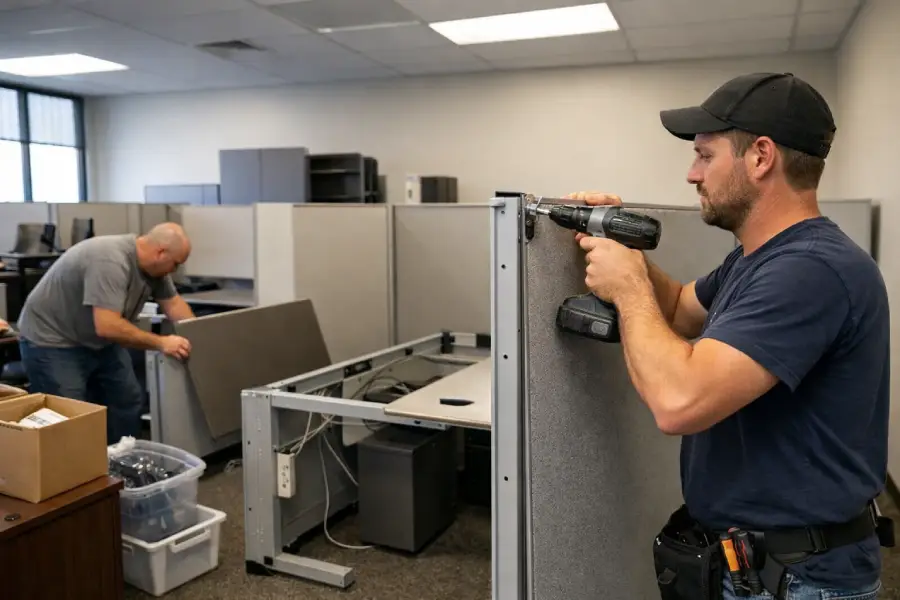
This guide is designed for standard office cubicles and usually requires at least two people.
With careful planning and the right approach, you can complete the job quickly and prepare the cubicles for moving, storage, or remodeling.
You Might Also Enjoy: How to Assemble Office Cubicles in 30 Minutes?
Tools & Materials You’ll Need
- Screwdrivers (Phillips and flathead): You will need both Phillips and flathead screwdrivers to remove different types of screws during disassembly.
These are basic tools, but they are essential for the job.
- Allen wrench or adjustable wrench: Many office cubicles use bolts or fasteners that need an Allen wrench or an adjustable wrench.
Having the right wrench helps you loosen parts quickly and safely.
- Rubber mallet: A rubber mallet is useful when parts are stuck and need a gentle tap.
It helps you separate panels without causing damage.
- Gloves and safety glasses: Safety should always come first.
Gloves protect your hands, and safety glasses help protect your eyes from dust or small debris.
- Ziplock bags for screws: Keep screws, bolts, and small hardware in ziplock bags so nothing gets lost.
This also makes reassembly much easier later.
- Labels or masking tape for organization: Use labels or masking tape to mark each part as you remove it.
Good organization saves time and prevents confusion during reassembly.
- Optional: Step ladder for overhead bins.
If your cubicle includes overhead bins or tall panels, a step ladder can make the job easier.
Use it when you need safe access to higher areas.
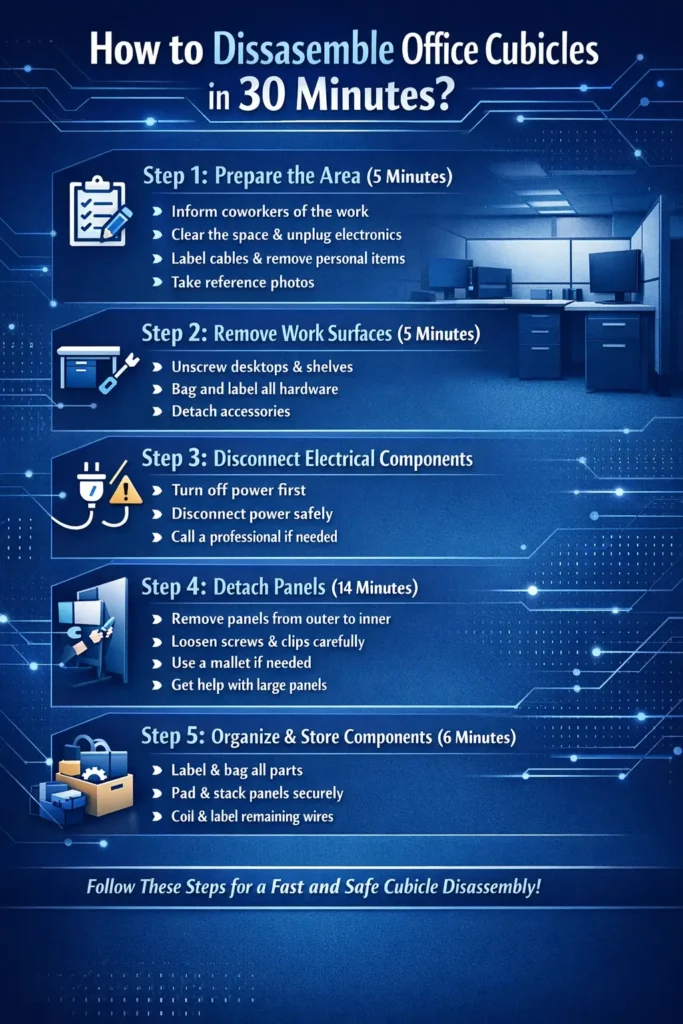
 Step 1: Prepare the Area (5 Minutes)
 Step 1: Prepare the Area (5 Minutes)
Before you start disassembling the office cubicle, prepare the area carefully.
First, inform your coworkers so they know the workspace will be in use.
This helps avoid interruptions and keeps the process safe.
Then clear the area and make sure you have enough space to work comfortably.
Next, unplug all electronics such as computers, monitors, and phones.
As you remove the cables, label them clearly so reconnecting them later will be easier.
You should also remove any personal items, files, and important documents from the cubicle to protect them from damage or loss.
Finally, take a few reference photos before you begin.
These photos will help you remember how everything was arranged and make reassembly much easier.
Step 2: Remove Work Surfaces and Accessories (5 Minutes)
After preparing the area, the next step is to remove the work surfaces and accessories.
Begin by unscrewing and detaching the desktops, drawers, shelves, and overhead bins.
Work slowly and carefully to avoid damaging any parts.
Some pieces may be heavy or awkward to move, so it helps to have another person assist you when needed.
As you remove each item, place all screws, bolts, and small hardware into labeled bags.
This simple step will save time later and make reassembly much easier.
Be sure to keep each bag organized by part or section.
You should also detach any mounted accessories, such as privacy screens or keyboard trays.
These items are often attached with small fasteners, so check them carefully before pulling them away.
By removing all work surfaces and accessories in an orderly way, you make the rest of the cubicle disassembly faster, safer, and more efficient.
You Might Also Enjoy: Where to Donate Office Equipment in The USA: Top 10 Options
Step 3: Disconnect Electrical Components If Applicable
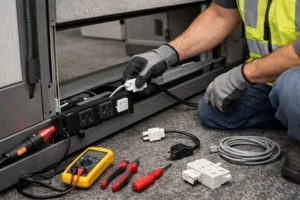
If your cubicle includes power connections, this step must be handled with extra care.
Before you do anything, turn off the electricity to the area.
Safety should always come first when working with electrical systems.
Once the power is off, disconnect any modular power systems by following the manufacturer’s instructions carefully.
These systems can vary from one cubicle to another, so it is important to use the correct method.
If you are not sure how to disconnect the electrical parts safely, do not guess.
It is better to call a licensed electrician and let a professional handle it.
This helps prevent damage, injury, and costly mistakes.
Taking the time to disconnect electrical components properly makes the rest of the cubicle disassembly process safer and more efficient.
Step 4: Detach Panels (14 Minutes)
Begin with the outermost panels and work your way inward.
This makes the process more organized and helps keep the structure stable as you move from one section to the next.
Before removing any panel, look for the connectors that hold it in place.
These may include screws, clips, spring locks, or brackets, depending on the cubicle design.
Once you find the connectors, loosen them carefully and separate the panels gently.
If a panel is stuck, you can use a rubber mallet to tap it lightly and help it come loose.
Be careful not to force it, as this may damage the panel or the frame.
For clip-on panels, lift the panel slightly and slide it apart from the connector.
This usually works better than pulling it straight out.
If the panels are large or tall, it is a good idea to have a second person help you.
Extra support makes the job safer and easier, especially when handling heavier pieces.
By detaching the panels with care, you reduce the risk of damage and make the rest of the cubicle disassembly process much smoother.
Step 5: Organize and Store Components (6 Minutes)
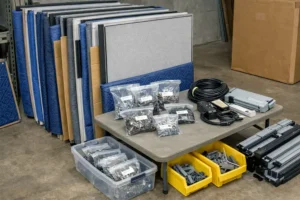 Step 5: Organize and Store Components (6 Minutes)
Once the panels and accessories have been removed, the next step is to organize and store all the parts properly.
Stack the panels vertically and place padding between them, such as moving blankets or cardboard, to help prevent scratches, dents, and other damage during storage or transport.
Keeping the panels upright also makes them easier to handle later.
Next, group all hardware by panel and label everything clearly.
Put screws, clips, brackets, and other small parts into separate bags so nothing gets lost.
Clear labeling will save time and make reassembly much easier if the cubicle is installed again in the future.
If there are any remaining wires or cubicle lighting systems, coil them neatly and label them as well.
This keeps the workspace tidy and helps protect the parts from tangling or damage.
Good organization at this stage makes the entire cubicle disassembly process faster, safer, and more efficient.
Common Cubicle Designs and Mechanisms
Cubicles are built with different connection systems, and each one works in a slightly different way.
Knowing the design of your cubicle can make the removal process faster and safer.
Panel-to-panel connectors can come in different types, depending on the cubicle design.
Some of the most common ones include metal or plastic clips, cam locks, screws, and lift-and-slide rails.
Each type works a little differently, so it helps to know what kind of system your cubicle uses before you start.
- Metal or plastic clips are often used to hold panels together in a simple way.
These clips are usually easy to release, but they still need to be handled carefully to avoid breaking the panel or connector.
- Cam locks and screws are also common in many cubicle systems.
These connectors usually create a tighter and more secure fit, so they may take a little more time to remove.
- Lift-and-slide rails work differently from clips or screws.
With this type of system, the panel usually needs to be lifted slightly before it can slide out of place.
This makes the removal process smooth, but only if it is done the right way.
That is why it is important to check the specific brand instructions before you begin disassembly.
If you are not sure how the cubicle is assembled, visit the brand’s website and look for a PDF manual.
A manual can give you clear steps and help you avoid damage during the process.
You Might Also Enjoy: What Are the Biggest and Smallest Sizes for Office Cubicles: Standard Cubicle Size
Tips for Speed and Safety

- Always disassemble with at least one other person.
Cubicle panels can be large, heavy, and awkward to move.
Having a second person helps make the job safer and faster.
It also reduces the risk of dropping parts or damaging the panels during removal.
- Use painter’s tape to label panel positions.
This is a simple but effective way to stay organized.
You can mark each panel with its location, which makes reassembly much easier later.
Painter’s tape is a good choice because it removes cleanly and does not leave much residue.
- Take photos before and during disassembly.
Pictures can be very helpful if you need to put the cubicle back together again.
They show how the panels, connectors, and hardware were arranged before removal.
This small step can save a lot of time and confusion later.
- Keep a small parts organizer or box for hardware.
Screws, clips, brackets, and other small pieces can easily get lost during the process.
A labeled organizer keeps everything in one place and helps you stay neat and efficient.
- Work in a clockwise or counterclockwise direction for consistency.
Following the same direction as you remove panels makes the process easier to track.
It also helps you avoid missing any parts and keeps the disassembly more orderly from start to finish.
When to Call a Professional
In some situations, it is better to call a professional instead of trying to disassemble the cubicles on your own.
This is especially important when the cubicles are hardwired into the building’s electrical system.
Electrical connections can be dangerous if they are not handled properly.
A licensed professional can disconnect everything safely and help prevent damage or injury.
You should also call a professional if the cubicle system has a complex locking mechanism or requires proprietary tools.
Some office cubicles are built with special connectors that are difficult to remove without the right equipment.
In these cases, an experienced technician can do the job correctly and avoid costly mistakes.
Professional help is also a good choice for large-scale disassembly projects or office relocations.
Bigger jobs usually need more planning, more time, and more workers.
Hiring a skilled team can make the process faster, safer, and more efficient from start to finish.
Conclusion
With the right tools and a little planning, disassembling office cubicles can be fast and manageable.
The process becomes much easier when you stay organized, label each part, and work methodically from start to finish.
These simple steps help you avoid confusion and keep the job moving smoothly.
If you follow a clear plan, it is possible to stay under 30 minutes, especially for smaller cubicle setups.
Careful preparation makes a big difference.
It also helps protect the panels, hardware, and electrical parts from damage during removal.
This process is ideal for office moves, layout changes, or storage.
A clean and organized disassembly saves time now and makes reassembly much easier later.
Small steps, done the right way, can save a lot of trouble.

John Ofield is the owner of Collaborative Office Interiors. Houston’s trusted source for modern and commercial office furniture, office cubicles, demountable walls, office desks and tables, and complete workspace solutions. With more than 40 years of experience, he combines deep product knowledge with hands-on space-planning expertise to create ergonomic, productivity-focused work environments for businesses across Southeast Texas.