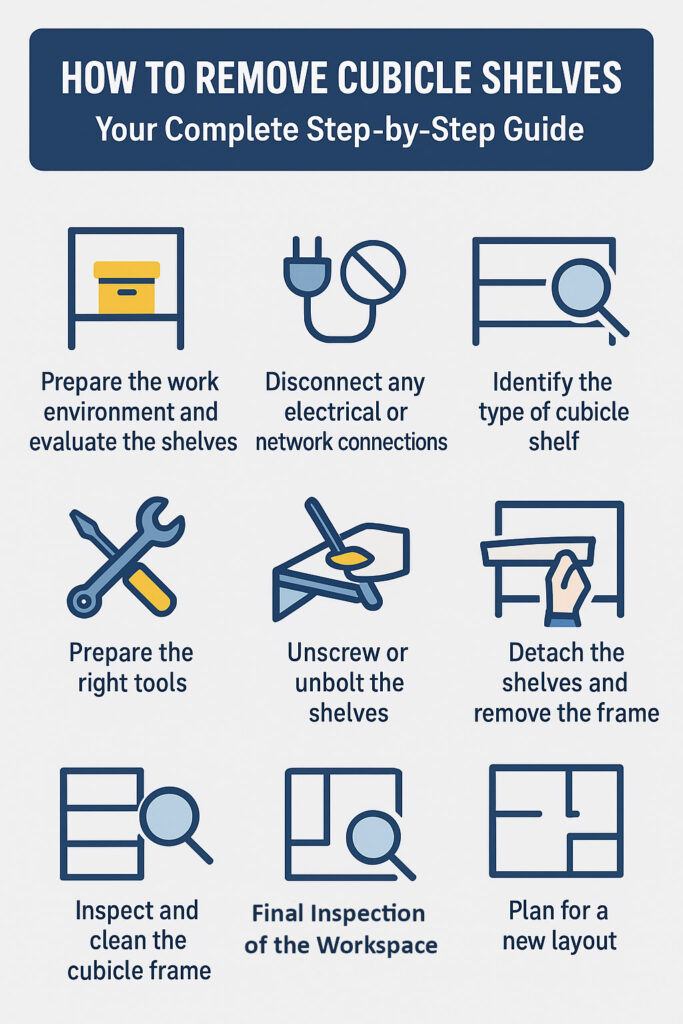
How to Remove Cubicle Shelves: Your Complete Step-by-Step Guide
If you use cubicles in your workplace, you may one day need to remove their shelves.
Maybe you need more storage space, or you want to change the design of your office to create a more organized and functional workspace.
You may even have to remove shelves to make repairs or update your decor.
Now the question is: how to remove cubicle shelves?
To remove cubicle shelves, first empty the shelf, then unscrew or unclip the brackets holding it, lift the shelf carefully, and store any hardware for future use.
With the right method and tools, removing Houston cubicle shelves is a simple task and can even become a fun DIY project for you and your coworkers.
First, prepare your work environment: clear the area around the shelves of excess items and follow safety precautions.
Identify the type of shelf and prepare the necessary tools, such as a screwdriver, pliers, and gloves.
In this step-by-step guide, from preparing the environment to completely dismantling the shelves, we’ll give you all the tips you need to make this task quick and hassle-free.
You Might Also Enjoy: How to Block Overhead Light in A Cubicle: Best 8 Ways
Tools and Materials You’ll Need
When removing cubicle shelves, it is important to have the right tools and equipment so that your job is done quickly, safely, and without damaging the environment or the shelves themselves.
Here we explain the necessary tools and equipment:
- Screwdriver: It is necessary to loosen the screws that attach the shelves to the frame or wall.
It is best to have a set of screwdrivers with different sizes to be compatible with the types of screws.
- Pliers or Wrench: It is used to loosen nuts or fasteners that a screwdriver cannot loosen.
Some shelves have strong bolts and nuts that cannot be removed without a wrench.
- Cutter: Useful for cutting adhesives or removing labels and sticky residue from shelves and frames.
- Gloves: Protect hands from cuts or scratches when moving shelves.
- Safety Goggles: Prevent dust or small pieces of metal or wood from entering the eyes.
- Dust Mask: Especially if the shelves are old or their wood and metal create dust.
- Check the material of the shelves: Screws and fasteners may vary between different types of shelves, sometimes requiring softening of the adhesive or primer before removal.
 Step 1: Preparing the Work Environment and Evaluating the Shelves
The first step of the answer to the question of how to remove cubicle shelves is evaluating the shelves.
To avoid any accidents or injuries, it is very important to prepare the workspace before starting to remove cubicle shelves.
First, you should remove all items from the shelves and any obstructions attached to the cubicle wall.
Items can include books, office supplies, and personal decorative items.
Also, anything that is likely to fall while working should be removed from the environment.
Determine whether the shelves are attached to the wall, ceiling, or floor.
This is very important in choosing the right method and tools for removing the shelves.
Pay attention to the type of connections: some shelves are secured with screws and nuts, some are attached to the frame with clamps or clips, and some may be mounted with glue or additional brackets.
Check the area around your cubicle.
Make sure the floor is clear of scattered objects, such as wires or paper, to reduce the risk of tripping.
A tidy and clean environment ensures both your safety and provides enough space to move tools and safely remove the shelves.
If you work in a shared space, it’s a good idea to let your colleagues know about your plan.
This will make others aware and prevent sudden interruptions.
You Might Also Enjoy: Top 10 Effective Ideas to Make Cubicles More Private in 2026
Step 2: Disconnect Any Electrical or Network Connections
Before removing the cubicle shelves, it is important to disconnect all electrical or network wires and cables that are connected to the back of the shelf.
Also, before taking any action, make sure the power is off and there are no live or live cables in your path.
For network or telephone cables, carefully disconnect them from the ports to avoid damaging the cables or connections.
This step ensures that the shelves removal process is safe and secure, and your equipment remains intact.
Step 3: Identify The Type of Cubicle Shelf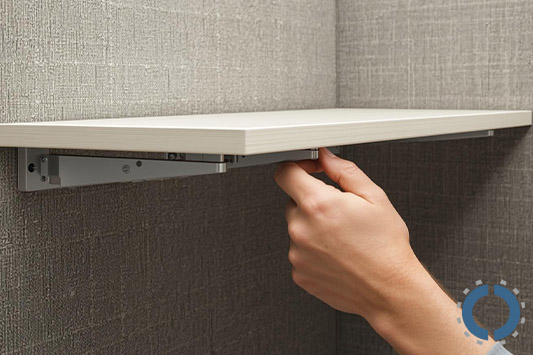
Not all cubicle shelves are the same.
Modern office cubicles come in a variety of designs and installation methods.
Some shelves are attached with screws, some with metal brackets, and others attach to the frame with a clip-on mechanism.
So to start, carefully examine the cubicle shelf to determine its connection type.
The screws are usually visible on the underside or back of the shelf.
Brackets may have a locking mechanism that requires precision and special tools.
Clip-on shelves are often snap-in and may require a pry tool to remove.
If you’re not sure, you can check the manufacturer’s labels or seek help from online resources for product-specific instructions.
Step 4: Preparing the Right Tools
In the step-by-step guide of how to remove cubicle shelves, it is necessary to gather the right tools.
Having the right tools makes the process of removing shelves much easier and safer.
- For shelves that are mounted with screws, use a standard screwdriver.
- For shelves attached with clips or brackets, a pair of pliers or a pry tool will work.
If the shelves are installed at a higher height, it is essential to have a sturdy ladder or step stool.
This prevents overstretching of the arms and reduces the risk of accidents or applying undue pressure when removing the shelves.
Wearing lightweight gloves will also help protect your hands from sharp edges.
Also, keep a small container or zip-lock bag nearby to collect screws, clips, and other parts as you disassemble the shelf.
Losing these parts can cause problems if you plan to reinstall or adjust the shelves.
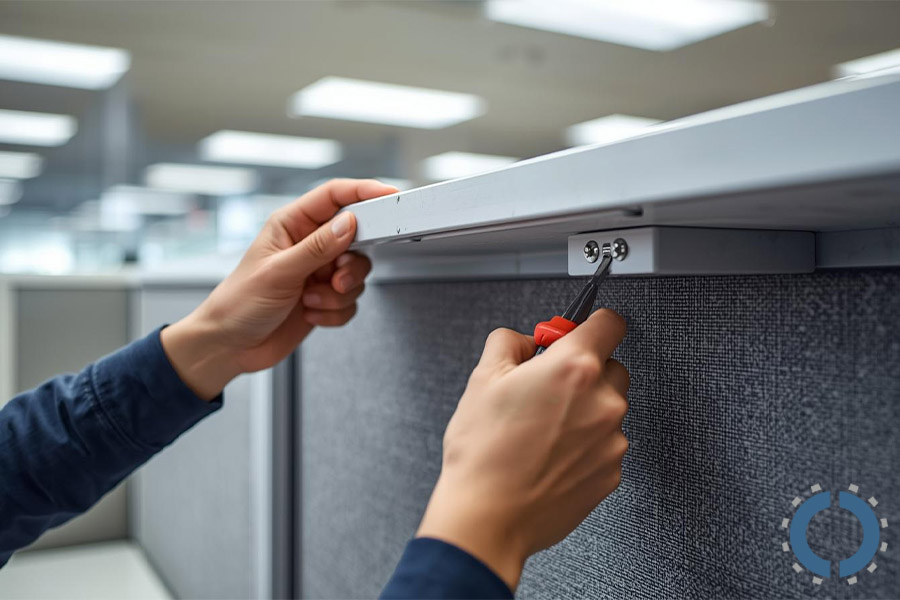
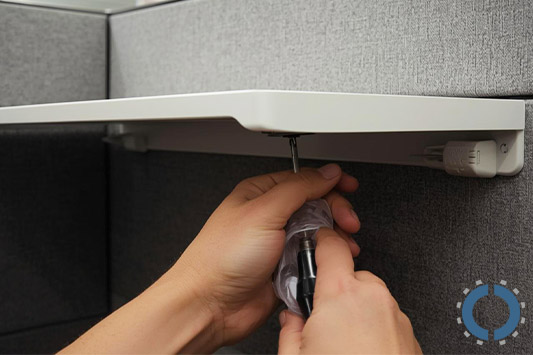 Step 5: Unscrew or Unbolt the Shelves
After preparing the environment and identifying the type of cubicle shelf, you can now unscrew the nuts and screws.
For shelves with screws, use a suitable screwdriver or, if necessary, a drill.
Loosen the screws slowly to avoid damaging the shelf or frame.
If the connections are complicated or the shelf is mounted with brackets and clips, use special tools such as pliers or a pry tool to be able to remove the shelf without damage.
If the shelves are attached to the wall or ceiling, removing them requires more care.
Avoid excessive pressure and make sure the shelf does not fall when opened suddenly.
With care and the use of the right tools, this step can be done easily and safely, bringing you closer to complete shelf removal.
You Might Also Enjoy: How to Hang Things on Cubicle Walls: 2026 Guide?
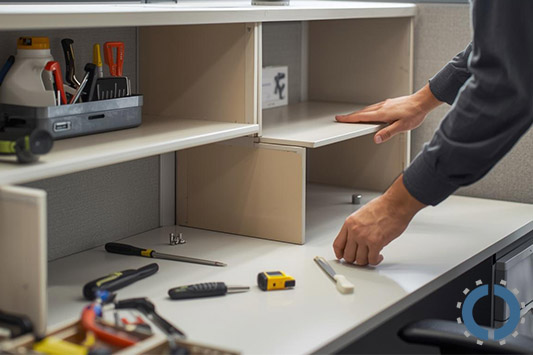
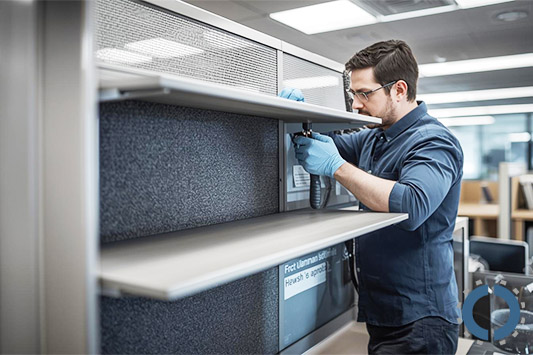
Step 6: Detach the Shelves and Remove the Frame
After loosening the screws and connections, it’s time to disassemble the shelves completely.
At this stage, you must act carefully to avoid damaging the cubicle frame, the wall, or the rack itself.
First, gently lift the shelf from the mounting location, making sure there are no hidden parts or clips still holding it in place.
If your shelves have a metal frame, you will also need to remove the frame from the wall or cubicle posts.
These frames are usually attached with metal brackets, screws, or locking tabs.
Using the appropriate tool, release them without applying too much pressure.
When lifting a shelf, hold it with both hands and balance it so that it does not fall suddenly or hit the wall.
If the shelf is large or heavy, get help from someone.
Performing this step carefully will ensure that the shelves remain intact and the cubicle structure is not scratched or damaged.
Step 7: Inspect and Clean the Cubicle Frame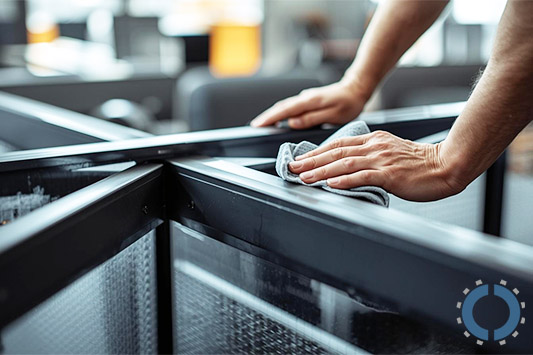
After removing the shelves, it’s time to inspect the cubicle frame and walls to make sure no damage was caused during the process.
Inspect the surface of the frame for scratches, dents, or loose connections; these may need to be repaired or replaced.
This is a good time to give the frame a thorough cleaning.
Use a damp cloth and a mild cleaning solution to remove any dust, fingerprints, or residue from previous adhesives and connections.
Avoid using harsh chemicals, as they may discolor or damage the cubicle surface.
Proper cleaning and regular maintenance will extend the useful life of the cubicle.
Once the shelving removal process is complete, it’s time to thoroughly clean the work area to keep everything tidy and safe.
This step not only tidies up the environment, but also ensures that your office space is ready to use again and completely safe.
If you notice structural problems during your inspection, it’s best to contact your office furniture supplier.
Companies like Collaborative Office Interiors can help you find replacement parts or offer cost-effective solutions like temporary office furniture rentals.
Step 8: Planning for A New Layout
After removing the shelf, it’s time to decide how to use the freed-up space.
First, accurately measure the dimensions of the cubicle to know how much space you have and what layout is most practical for you.
It’s also best to consider your daily needs before making any decisions: what devices you use the most, what level of quick access you need, and what parts of your workspace are not yet optimized.
With this look, you can determine whether you need to add a wall shelf, a small filing cabinet, or even a movable office desk.
If the cubicle space is shared, it is best to coordinate with your colleagues so that the new layout is compatible and attractive not only for you, but also for other people.
Careful planning at this stage will allow you to make the most of the newly freed space and create a more professional and organized work environment.
If you’re looking to add new shelving or are looking for more storage options, companies like Collaborative Office Interiors offer a diverse range of modern and functional solutions.
Their experience and expertise in office furniture design can help you make your workspace both beautiful and most efficient.
 Step 9: Shelf Maintenance or Reinstallation
If you plan to use the shelf in the future, it is best to store it properly and in good condition so that it does not get damaged.
Place the shelf in a dry, clean environment, away from heavy objects that may scratch, warp, or deform it.
Also, keep the screws, clips, and brackets you removed in the previous steps in the same labeled container and place them next to the shelf so that everything is accessible when you need to reinstall.
If you want to immediately install the shelf somewhere else, first carefully align it with the new attachment points.
Then tighten the screws evenly until the shelf is completely secure and stable.
If you use clamps or brackets, lock them carefully in place so that the weight of the shelf is properly supported.
Proper maintenance or regular reinstallation will make your office cubicle system last longer and allow you to make new changes to your workspace layout without any hassle in the future.
You Might Also Enjoy: Top 12 Ways to Make Your Cubicle Cozy in 2026
Step 10: Final Inspection of the Workspace
At the end of removing the cubicle shelves, take a few moments to look at your cubicle from a broader perspective.
Has removing shelves made your workspace look tidier and more cohesive?
Perhaps with this change, you will realize that there are other areas that could create more productivity with a little modification.
An organized workspace has a direct impact on focus, mental discipline, and speed of work.
The more peaceful and purposeful your surroundings are, the more energy you will have to complete daily tasks and the more comfortable and motivated you will feel throughout the day.
Why It’s Important to Remove Shelves Correctly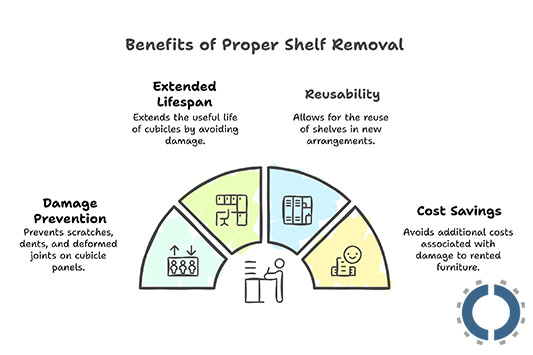
Taking the time to properly disassemble the shelves will prevent damage to the cubicles and extend their useful life.
If this is done incorrectly, it may cause scratches, dents, or deformed joints on the cubicle panels.
Additionally, when the shelves are properly disassembled, you can reuse them later in a new arrangement.
If you have rented office furniture, proper care of the equipment is even more important, as any damage can result in additional costs for you.
Affordable options like COI office furniture rental services allow for a flexible and up-to-date workspace, but proper maintenance and regular equipment relocation play a critical role in managing costs and maintaining the quality of the work environment.
Transform Your Office with Collaborative Office Interiors
Removing cubicle shelves systematically doesn’t just free up space; it also provides an opportunity to make your workspace tidier, more efficient, and better organized.
Following these steps correctly will help you update your Houston workspace and make the most of every square foot without damaging panels or equipment.
If you’re thinking about renovating your office, optimizing your current layout, or adding better storage solutions, Collaborative Office Interiors is ready to help you every step of the way.
Offering a complete range of modern private office cubicle designs, functional office furniture, and professional installation and support services, the company helps you create a work environment that exactly meets your team’s needs.
Contact us today to receive a free consultation, explore your options, and start designing your new office.

John Ofield is the owner of Collaborative Office Interiors. Houston’s trusted source for modern and commercial office furniture, office cubicles, demountable walls, office desks and tables, and complete workspace solutions. With more than 40 years of experience, he combines deep product knowledge with hands-on space-planning expertise to create ergonomic, productivity-focused work environments for businesses across Southeast Texas.
